How to Upload Maps to Steam Workshop Cs Go

Counter-Strike: Global Offensive
This item has been removed from the community because it violates Steam Customs & Content Guidelines. It is only visible to you. If you believe your item has been removed by mistake, delight contact Steam Support.
This item is incompatible with Counter-Strike: Global Offensive. Delight encounter the instructions folio for reasons why this item might not work within Counter-Strike: Global Offensive.
Current visibility: Hidden
This item volition only be visible to you, admins, and anyone marked equally a creator.
Electric current visibility: Friends-only
This detail will just be visible in searches to you, your friends, and admins.

Non enough ratings

How to: Upload CSGO Hammer 4.x map to Steam Workshop
In this guide, I volition give you a step-by-footstep tutorial on how to go your map on the workshop!
Before You Start
In this guide, I volition teach you how to upload your own fabricated Hammer 4.x (or above) map to the Steam workshop.
Earlier you start out, yous need to take a few things ready;
- Counter Strike: Global Offensive installed
- A solid internet connection
- Your saved .BSP file
- The other files that come with the .BSP file (example: .VMF file)
- Screenshots of your map
- A thumbnail that looks skilful (Tip: Add some filters and large text in a programme similar Photoshop)

At present, in one case you have those files prepare, we can go to the first footstep!
Step 1: Placing your files in the right place
This step is very,
very important(every bit of Januari 2019) considering if yous place your files in the wrong folder... you will get the very common error: Fault opening *your file* (bank check for write enable)
How to?
To do this right, you take to go to your CSGO install directory.
This is probably right here:
This is what my CSGO directory looks similar:
Your directory might look a little unlike, but don't worry nigh that.

What you want to practise next is click on the folder "csgo" -> "maps"
Now you should be right here: C:\Program Files (x86)\Steam\steamapps\common\Counter-Strike Global Offensive\csgo\maps
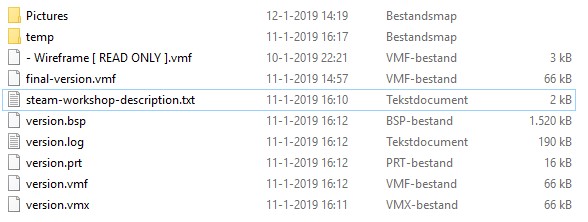
In this folder, you want to brand a new folder and identify all your CSGO SDK files that Hammer made for you in there.
Mine looks similar this: C:\Program Files (x86)\Steam\steamapps\common\Counter-Strike Global Offensive\csgo\maps\Fast Paced 1v1 Map
You probably don't have the pictures folder and the "steam-workshop-description.txt" file. That's because I put those in there myself. It'south just so that I know where I can find those files later on on if I want to update my map.
When you're washed, we can get to the adjacent step.
Stride ii: Uploading to the Workshop
Well done! Y'all now made certain that you lot don't go the common mistake "check for write enable" Let'southward get to the next stride.
To proceed our (extremely short) journey to uploading our map, you have to start up your Counter Strike: Global Offensive game from the Steam client.
The developer console
When yous are at the chief menu, you want to open the programmer console. You can turn this on in settings -> game settings -> developer console "on".
The standard key the open the developer panel is "~" merely I prepare mine to "NUMPAD *" in the keyboard settings. It's upwards to you lot.
To open the workshop publisher in CSGO, yous take to follow these steps in lodge.
1. Open the programmer panel.
2. Type "workshop_publish" and printing "Enter" or "Render" on your keyboard.
You will at present come across this screen:
Click on "Map" in the top-right-hand selection dots.
After that, click "Add" in the lower-right-manus corner.

Yous will now meet this screen:
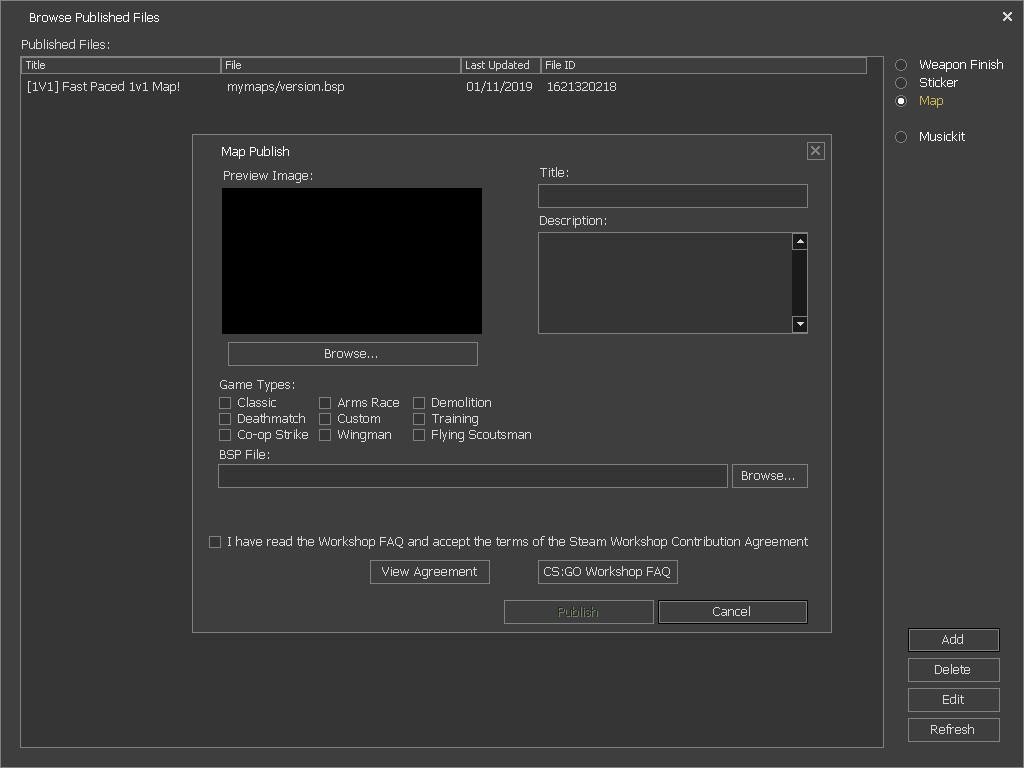
Publishing the map
Fill this part in for yourself, but
simplyput i word in the "Description" box, every bit this will just let y'all utilize a certain amount of words in the workshop publisher. Don't worry, we will change this later in bodily workshop folio. For at present, just blazon something like "Text".
For the BSP file, yous want to select the .BSP file that you saved before in:
C:\Program Files (x86)\Steam\steamapps\mutual\Counter-Strike Global Offensive\csgo\maps\your-map-proper nameFor the preview image, select a screenshot of your map, or a nice edited thumbnail similar this one:
When y'all're washed, tick the "I accept read the Workshop FAQ......" box and click "Publish"
At present Steam will prompt you to type something like "I Understand" in the text box so that there won't be some other M4A4 - Howl in the game.
Now we are near done!
Stride 3: Giving your map a clarification, calculation pictures and backup
Well done, you lot are at the last and final step to becoming a professional person CSGO map maker! :)
You lot tin close your CSGO now.
To come across your map in the workshop, go to your Steam profile, click "Workshop Items" and it will be in the list.
First off you want to put your map on private, so we accept all the fourth dimension to alter it and brand the page look actually good!
To do this, click on "Alter Visibility" in the possessor controls box and set up it to private.

Hmm but didn't we forget something? Ah yep! We forgot the description!
To change the description, get to your workshop particular, click "Edit title & description" in the possessor controls box and give your map a nice description. You can become all out with GIF's, screenshots, links, assuming text, underlined text, italic text and way more than! Become alee and play with this for a while, this guide won't leave. :P
To add your squeamish screenshots and/or videos to the page, click "Add/edit images and videos" in the owner controls box and upload them.
If other people contributed in making this map, you can add them by clicking the "Add/remove Contributors" and y'all can select people from your friend list. One time you save, it doesn't show them right abroad. Your friends take to accept that they have contributed on this workshop item from their own invites.
Don't forget
Don't forget to change the visibility dorsum to "Public" when you lot are complete done!
BACKUP!
This is probably the Most important matter if you don't want to re-write your clarification every fourth dimension you update your map (how I volition explain in the adjacent affiliate)
Like I said earlier, the workshop editor only allow'due south you use a certain amount of words, so please make a straight copy of your description and place it in a text file. (Instance: Notepad) Save this in a place where it won't become deleted and where you tin find information technology again. That's why I put mine in the folder with the .BSP.
(Optional) Pace 4: Updating your map
Ah y'all've come up to update your map, don't worry it is not hard at all!
How to update
To update your map, yous have to open your Counter Strike: Global Offensive game again and open your workshop publisher.
In one case you lot click on the "Maps" button, yous volition see that your map is correct there!
To update it, highlight it, and click "Edit" in the lower-right-hand corner.

Select your new .BSP file, select your new(or sometime) thumbnail and as y'all can see there is a new box.
This new box says "Changes this update"
In this box you can type update/patch notes to inform your map users what has changed in that update.
Again, you can become all out with bold text, underlines text, ect.
In one case you are done, tick the "I take read....." button and click "Publish"
Type "I Empathise" again and hit "Ok"
At present your map is updated!
Restoring the description
In the previous affiliate, we made a backup of your workshop item'due south description. And this was for a reason. When you go dorsum to the map's workshop page after updating, you can encounter that the clarification is cut off if it was long enough. If it's non the instance, then at that place is no problem.
But if yous had a long clarification, y'all accept to copy and paste that text backup from the saved file into the edit description box.
I hope it makes sense.
Cheers for reading
Thank you all for reading my guide, I promise I've helped you!
If I forgot something or if you take a question, delight go out them down in the comments of this guide or send me a pm on Steam.
I will keep updating this guide if things change in the process.
Run across you!
My 1v1 map I've used for reference in this guide
![]()
![]()
You demand to sign in or create an account to do that.
Source: https://steamcommunity.com/sharedfiles/filedetails/?id=1622400517
Post a Comment for "How to Upload Maps to Steam Workshop Cs Go"